Fields
The settings of the field properties (Fig. 86), such as the display of the background and the events from the update of all fields in the drawing, can be done using the “Field Update Settings..” tool in the window of the program properties “Options” on the “User Preferences” tab where the tool opens a menu in which we can select the time of the update for all fields - the following options are available:
- opening of the drawing
- saving the drawing
- printing the drawing
- eTransmit
- regeneration of the drawing (command “REGEN” or “REGENALL”)
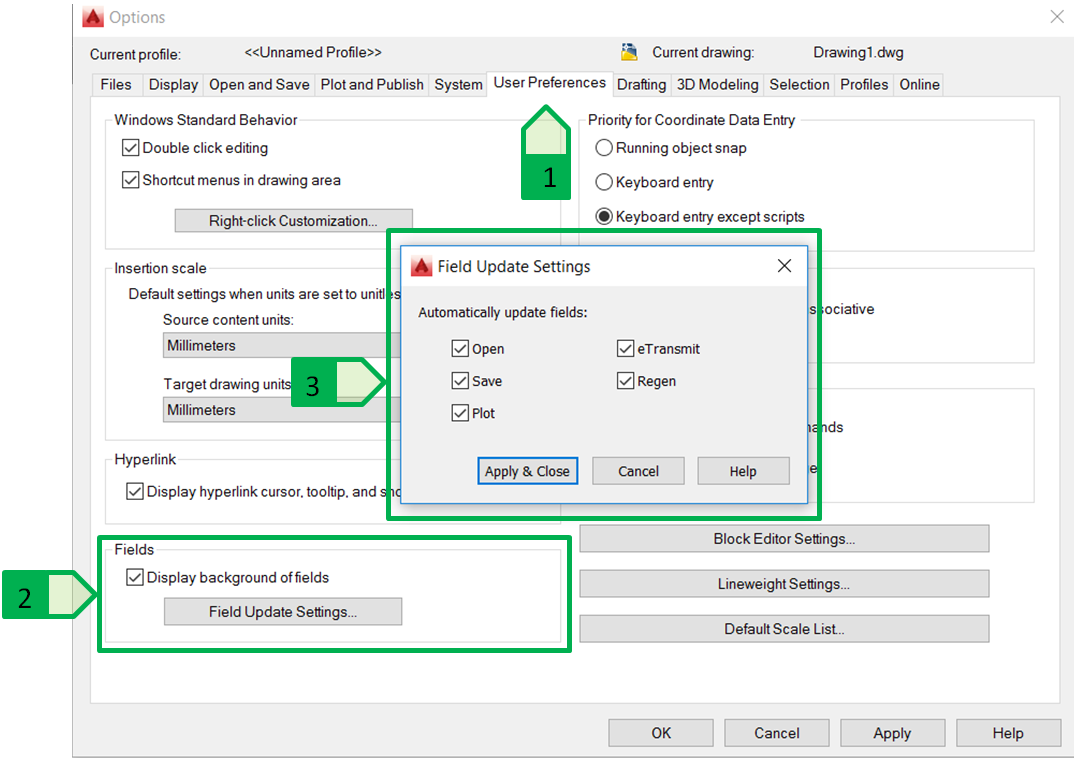
Fig. 86: Setting the field properties in the properties window “Options”, 1 - “User Preferences” tab; 2 - field setting; 3 - options of the update events for all fields in the drawing
Inserting fields into the text objects
Adding a field into a single-line or paragraph text is done in the editing mode of the respective text object. To record the date of the last saving of the drawing, we create a text object with the text “Date of the drawing saving:”, where a field containing the date and time of the file creation will be placed behind the colon. After entering the text “Date of the drawing saving:”, right-click on the local menu and select the “Insert field” option that opens the dialogue window to insert the field (Fig. 87).
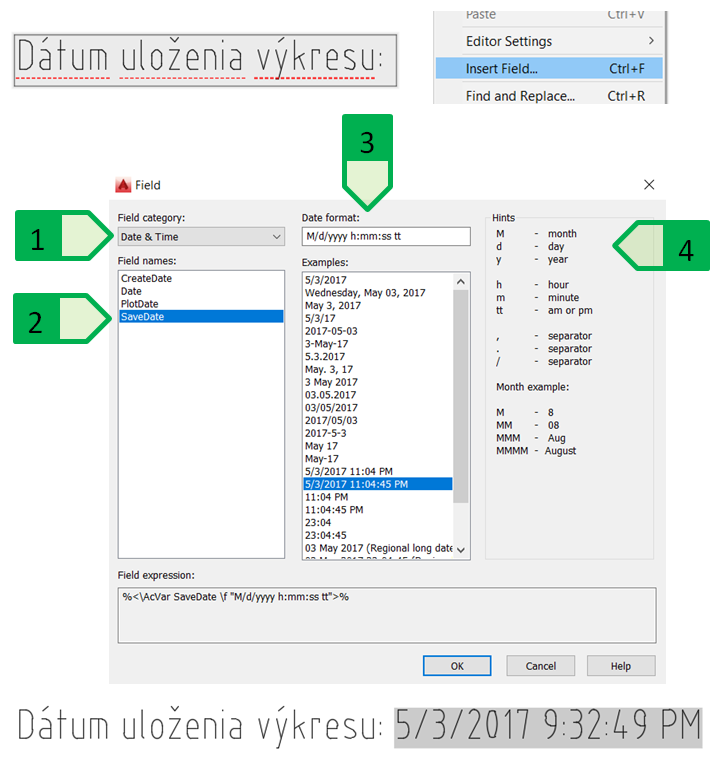
Fig. 87: Inserting the field for the date of the last saving of the drawing. Inserting the field into a single-line text from the local menu (at the top); Dialogue window with the properties of the inserted field (in the middle); Single-line text with the inserted field of the date and time (at the bottom); 1 - field category (Date & Time); 2 - field name (SaveDate - date of the saving); 3 - date format; 4 - key and help for the date fields.
If it is necessary to change data the field has to display, the adjustment is done by double-clicking on the field during text editing and then by selecting the required field.
More than one field can be added to the text object, for example, in the text data above, it is possible to add a field showing the name of the user who made the last change using the same procedure - by activating the local menu and inserting the field. If necessary, also another text can be inserted between the fields (Fig. 88).

Fig. 88: Multiple fields inserted in one object of a single-line text, 1 - date field of the last saving of the drawing; 2 - name of the user who last saved the drawing
In a similar way, it is possible to insert fields into the table cell. In the existing table of the sewer pipes, we modify, or remake the cells of the lengths of the individual sewers so that the length data take the length of the object of the line representing the respective sewer. If the length of the sewer changes, it will not be necessary to manually overwrite its length in the table - the data will be updated, for example, after saving or regenerating the drawing. The advantage of this procedure is that the works on the project usually involve changes in the dimensions of the sewers, which, thanks to the use of the fields, are almost instantly projected into the table without the need for manual overwriting of the data.
In case of paragraph texts, adding fields can be done only in the text editor by using the local menu activated by clicking the right button of the mouse or by using the “Insert” tool on the Text Editor” tab (Fig. 92).
Inserting the fields into the attributes
If blocks with attributes are used, fields can be added to the attribute by editing attributes in the window for the advanced attribute editor, where we insert the field using the local menu that is activated by the right button of the mouse.
In this way, it is easy to describe the various elements. In case of the sewer system in the municipality Veľký Lapáš, a block with attributes was created for the description of individual sewers (Fig. 89).
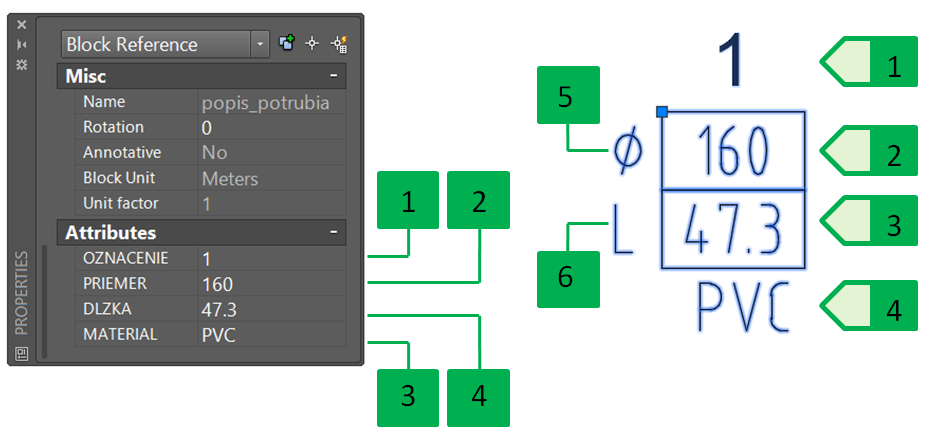
Fig. 89: Block for the description of the individual sewers, 1 - attribute of the sewer number; 2 - attribute of the pipe diameter; 3 - attribute of the pipe length; 4 - attribute of the pipe material; 5 - text of the note (pipe diameter); 6 - text of the note (pipe length)
We insert a field into the attribute of the pipe length which will display the value of the line length representing the respective sewer. In the dialogue box for field insertion, we select the “Objects” category of the fields as we want to ensure that the attribute displays the parameter of the existing object - the length of the line creating the sewer. The “Object” option is selected in the field name, and then we select the object of the line for sewer no. 1 for the selection of the required object. In the list of object properties we select the “Length” option as this is the length parameter of the selected object. We select the “decimal” option as the field format to display in the decimal number format and we set the accuracy to two decimal places (Fig. 90).
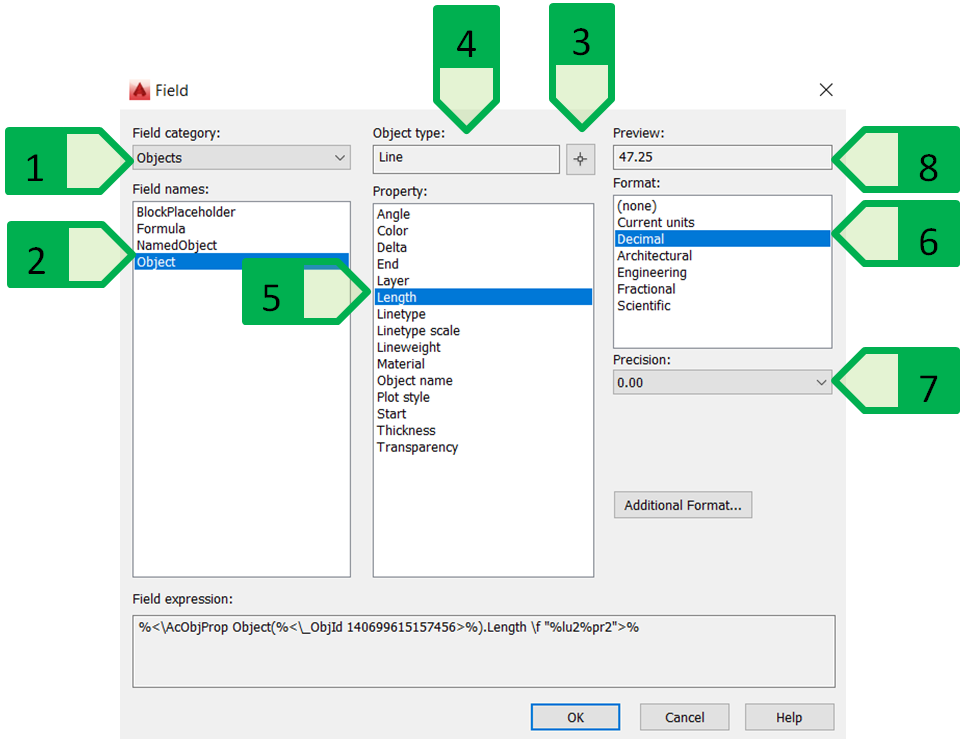
Fig. 90: Inserting the field of the line length into the attribute, 1 - field category (Objects); 2 - field name (Object); 3 - tool for the selection of the required object; 4 - displaying the type of the selected object; 5 - parameter of the selected object that will be displayed as a field (Length - length of the selected line); 6 - field format (Decimal); 7 - accuracy of the field value; 8 - preview of the field with the current setting
The value of the line length inserted as a field is then displayed in the selected formatting and the attribute, or the field in the attribute will be highlighted in colour both in the window of the advanced attribute editor and in the design block itself in the drawing (Fig. 91).
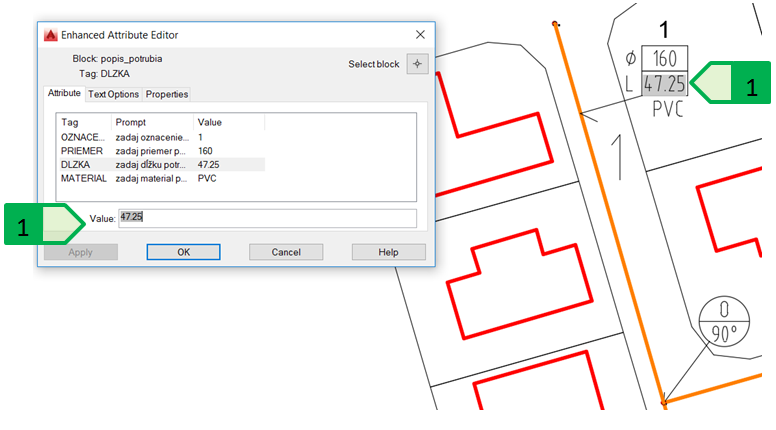
Fig. 91: Field inserted into the block with an attribute, 1 - highlighted text indicating the use of the field in the advanced attribute editor (on the left) and in the drawing (on the right)
Inserting the fields into the tables
The field is inserted into a cell using the local menu by clicking the right button of the mouse during cell editing, using the “Field” tool on the “Insert” panel on the “Table cell” tab or during the editing of the selected cell using the “Field” tool on the “Insert” panel on the “Text editor” tab (Fig. 92).

Fig. 92: Inserting the field into the table cell. Insertion into the cell (on the left); Insertion during the editing of the cell content using “Text editor” (on the right); 1 - tool “Field” to insert the field of the edited cell text or paragraph text.
As with inserting a field into an attribute, it is also possible to insert the length of the line of sewer no. 1 into the table cell as a field, and, using appropriate format settings, we can ensure the required formatting of the value shown in the table. After the possible change in the length of this line and subsequent regeneration (or another event that is selected for field updates), this field will be updated, and therefore the value displayed in the table will be changed too (Fig. 93).
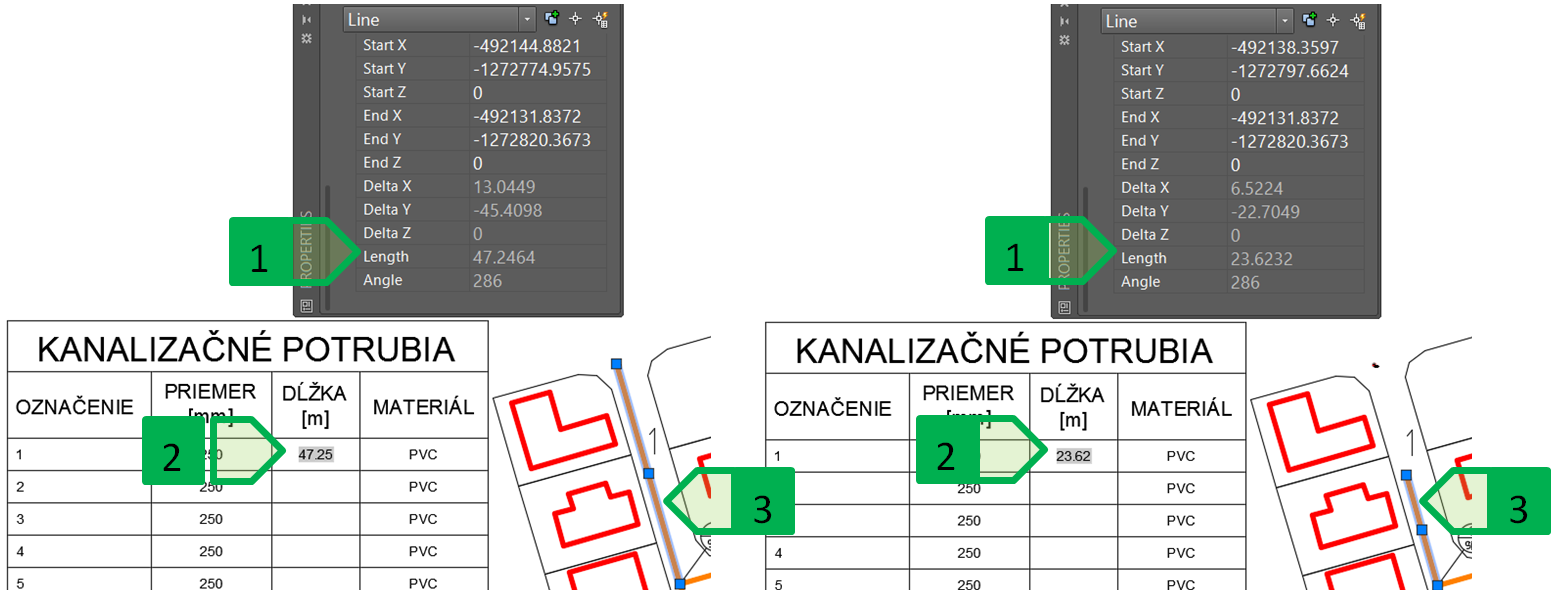
Fig. 93: Updating the field inserted into the table cell. Status before the change of the line length and field updates (on the left) and after the change of the line length and field updates (on the right); 1 - length of the selected line; 2 - cell with a field displaying the length of the selected line; 3 - selected line.
Field linking
We can refer to other fields using the fields. In the sample example describing the insertion of a field into a table, we referred to the value of the line length. But we can use the field inserted to the table to refer to the field of the block attribute describing the respective sewer which is used to refer to the value of the line length. If the cell fields contain numeric data, it is possible to perform mathematical operations with cells using formulas - addition, subtraction, multiplication, division, and others (Fig. 94).
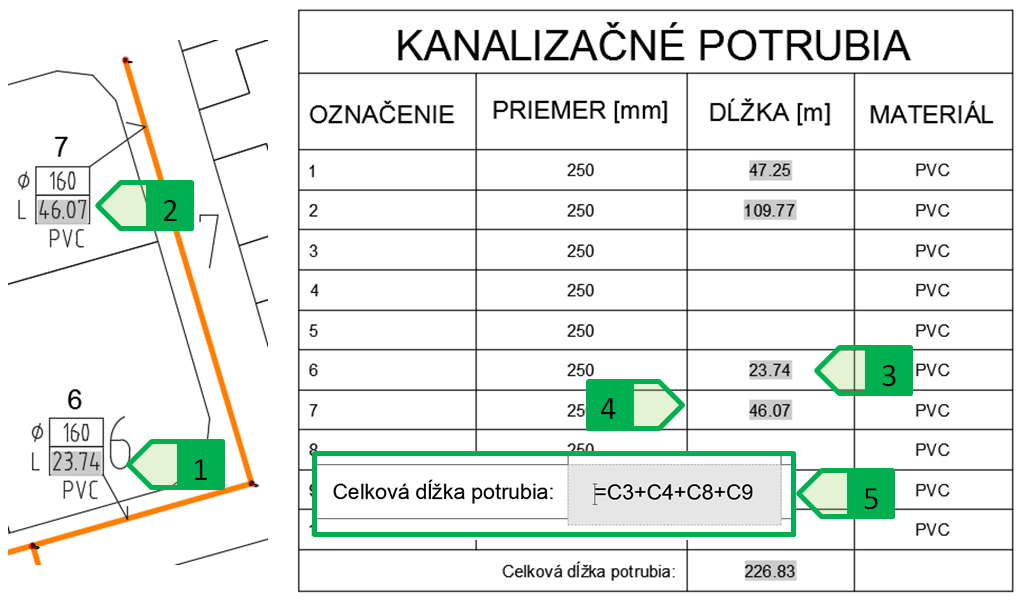
Fig. 94: Field linking. 1 - length of sewer no. 6 in the block attribute as the field referring to the line length; 2 - length of sewer no. 7 in the block attribute as the field referring to the line length; 3 - length of sewer no. 6 in the table as the field referring to the block attribute; 4 - length of sewer no. 7 in the table as the field referring to the block attribute; 5 - total length of sewers no. 1, 2, 6 and 7 calculated as the sum of the cells with a correct result
However, the calculation with the sum formula will not work in this case because the sum formula only works with numeric data, but when using a field referring to an attribute, this field has a text format and therefore these values will not be included in the calculation (Fig. 95).
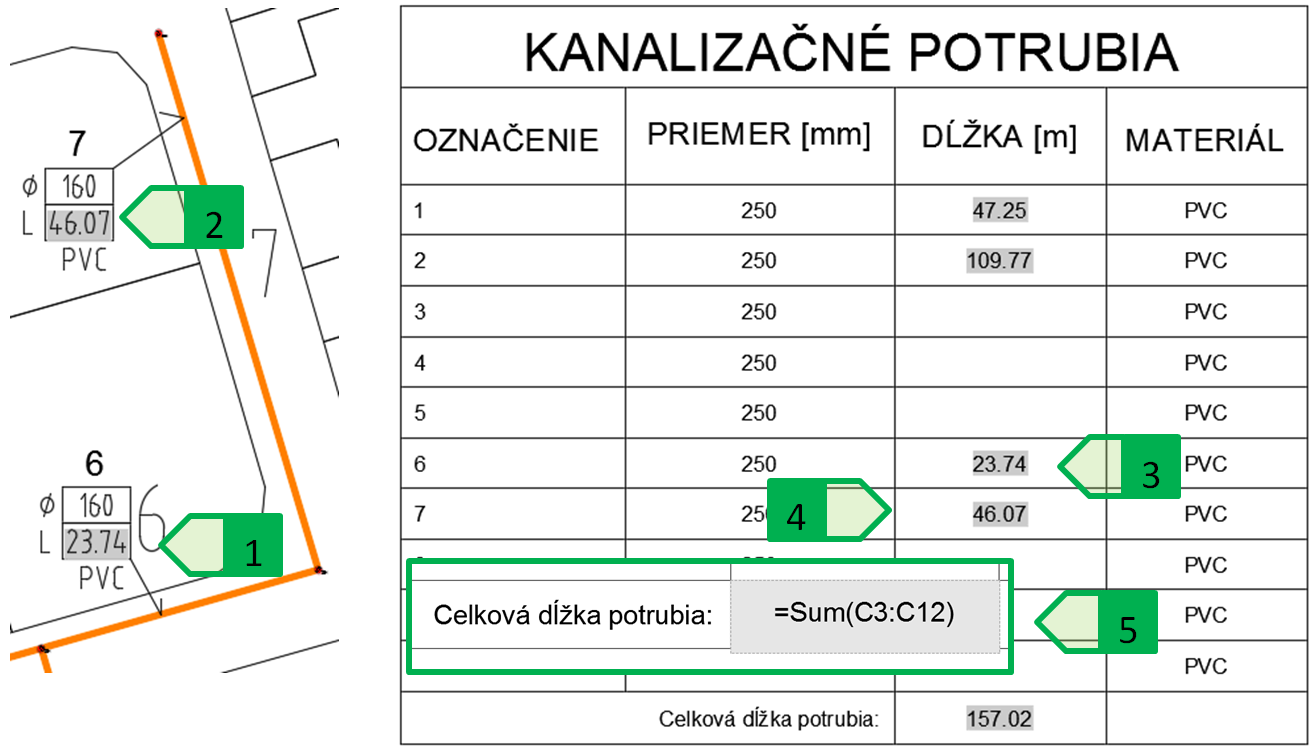
Fig. 95: Field linking. 1 - length of sewer no. 6 in the block attribute as the field referring to the line length; 2 - length of sewer no. 7 in the block attribute as the field referring to the line length; 3 - length of sewer no. 6 in the table as the field referring to the block attribute; 4 - length of sewer no. 7 in the table as the field referring to the block attribute; 5 - total length of sewers no. 1, 2, 6 and 7 calculated as the sum of the range cells with an incorrect result