Coordinate systems and units in the CAD environment
Drawing units
When working in the AutoCAD environment, we can see two basic units - the length units and the angular units. Depending on the requirements on the drawing documentation, it is therefore necessary to take into account the units - the work with the drawing with meters will be different than the work with the drawing of the ground plan of a building using millimetres. It is also necessary to take into account the work where we will require angular units in decimal degrees, in the units: degree - minute - seconds, in radians or in grades. The drawing units are managed using the “UNITS” command, which opens a dialogue box where you can set the individual parameters of the drawing units.
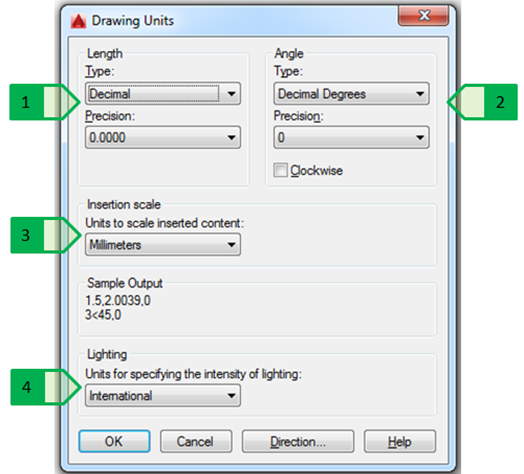
Fig. 1: Window for the setting of unit parameters: 1 - type and accuracy of length; 2 - type and accuracy of angles; 3 - drawing units for content insertion; 4 - units for lights
The setting of units of length and angle are taken into account in the current drawing and are not transferred into other drawings, but the settings of the drawing units (Fig. 1 – 3) affect the combination of designs from multiple drawings - whether during the transfer of blocks between drawings or when external references are added. This is discussed in detail in Chapter “Using blocks in multiple drawings.
Units of length
|
Type |
Description |
Accuracy |
Example: Length value 22.5 |
|
Architectural |
Whole feet and inches |
Whole inches up to 1/256 of the inch |
1'-10 1/2" |
|
Decimal |
Decimal units |
0-8 decimal digits |
22.500 (accuracy - 3 thousandths) |
|
Engineering |
Whole feet and inches |
0-8 decimal digits of the inch |
1'-10.5" |
|
Fractional |
Integral number and fragment |
Integral number up to 1/256 of the unit |
22 1/2 |
|
Scientific |
Exponential |
0-8 decimal digits |
2.250E+01 |
Angular units
|
Type |
Accuracy |
Example: Angular value 12.5 |
|
Decimal degrees |
0-8 decimal digits of the degree |
12.5 (accuracy - one tenth) |
|
Deg/Min/Sec |
Whole degrees up to 4 decimal digits of the second |
12d30'0" (accuracy - whole seconds) |
|
Grades |
0-8 decimal digits of the grade |
13.889g (accuracy - 3 thousandths of the grade) |
|
Radians |
0-8 decimal digits of the radian |
0.218r (accuracy - 3 thousandths of the radian) |
|
Cardinal directions |
Whole degrees up to 4 decimal digits of the second |
N 77d30'0" E (accuracy - whole seconds) |
It is necessary to take into account that the setting of the unit system or of their accuracy is then reflected in several aspects such as object properties or value measurement such as angles, lengths, areas or volumes. But this setting does not affect the accuracy of displaying the length or angles values in the dimensions - this accuracy is solved by the setting of the dimensioning styles (Fig. 2).
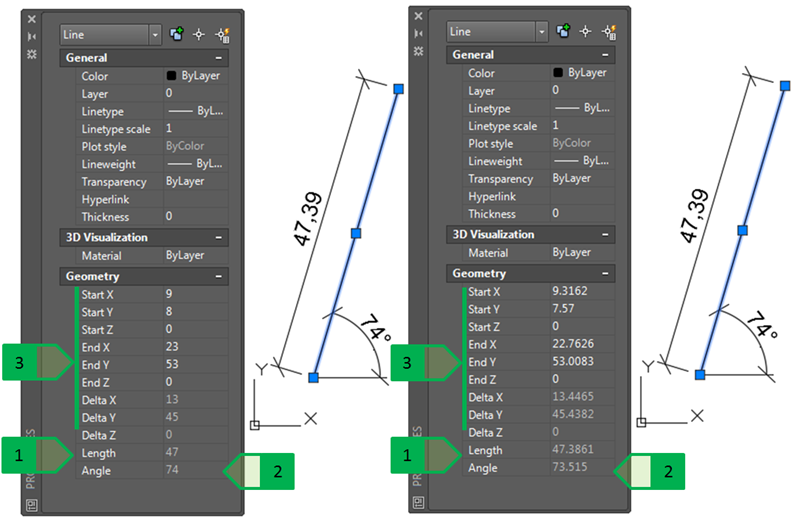
Fig. 2: Showing the lengths and angles when setting accuracy to an integral number (on the left) and to four decimal places (on the right),
1 - line length; 2 - line angle; 3 - coordinates of the starting and ending points of the line
Note -the values of the length and angle dimensions remain the same in both cases because the setting of the length (4 decimal places) and angles (integer) accuracy is solved by the setting of the dimensioning style
S-JTSK coordinate system in the AutoCAD environment
The drawing documentation for landscape planning often requires an elaboration in the S-JTSK coordinate system for sequential demarcation using geodetic methods in the terrain, for example the demarcation of the layout of surface objects (e.g. fuel station, reinforced surfaces) or the routes of line objects (road axis, banks of the revitalized watercourse channel), as well as the retrospective marking of the measured values for the planimetry and topography (terrain relief, land borders), localized geodetically. But there is a problem between the S-JTSK coordinate system and the coordinate system of the AutoCAD system during the demarcation of objects formed by a series of points with known coordinates.
In the AutoCAD program, the axis orientation is as follows:
- the values on axis x go from left to right (from west to east),
- the values on axis y go from the bottom up (from south to north).
In the S-JTSK coordinate system, the axis orientation is as follows:
- the values on axis x go from top to bottom (from north to south),
- the values on axis y go from right to left (from east to west).
For this reason, during the completion of these tasks, the coordinates are corrected in two steps:
1. the numeric value of the coordinate is given in a negative form,
2. the axes x and y are interchanged.
For example, the coordinate of the point - the entry to the premises of the Department of Landscape Planning:
S-JTSK coordinates: X= 1268052; Y= 498742
AutoCAD coordinates: X= -498742; Y= -1268052
This correction does not change the mutual spatial relationships - the distance between the two objects and their mutual position is the same. At the same time, it is ensured that the construction, or its parts marked in the drawing documentation can then be geodetically demarcated.
The usual task is to insert the drawing of the construction, which is prepared in a separate drawing in millimetres, which is the standard in the project documentation of buildings, into a drawing of the situation prepared in the S-JTSK coordinate system. In this case, we work with two or more drawings that are prepared in different units:
- the situation drawing in S-JTSK prepared in metres,
- the documentation of the construction prepared in millimetres.
The insertion of the construction drawing into the situation drawing and its subsequent geodetic demarcation in the terrain therefore requires a change in the scale of the construction drawing and the subsequent insertion and fitting into the situation drawing. The transfer of the entities between the drawings can be done by using several commands such as:
- The cutting of the objects - the command “CUTCLIP” (or the shortcut Ctrl + X) – it cuts the object from the original drawing into a clipboard, the coordinates of the reference point are [xmin,ymin] – the smallest x as well as y coordinates of the cut objects.
- The copying into the clipboard - the command “COPYCLIP” (or the shortcut Ctrl + C) – it copies the object from the original drawing into a clipboard, the coordinates of the reference point are [xmin,ymin] – the smallest x as well as y coordinates of the cut objects.
- The copying into the clipboard through a reference point - the command “COPYBASE” (or the shortcut Ctrl + Shift + C) - it copies the object from the original drawing into the clipboard, the reference point has the coordinates according to the entered point (using the keyboard for entering its coordinates or by selection - clicking on the required point).
The insertion of an object into the drawing is done by using the command “PASTECLIP” (or the shortcut Ctrl + V) that inserts the transmitted object grabbed at the reference point (depending on the entity transfer method that is being used) to the insertion point that we enter using the coordinates or by clicking on the desired location.
Note: The greatest control over the copying and then the insertion of the objects into a drawing is provided by the method of copying to the clipboard through a reference point as the user chooses which point to consider as a reference one when copying, and because of that this method of transferring objects is described below.
When transferring a construction object into a drawing, it is advisable to first create a copy of the floor plan, then reduce the copy using the command “SCALE” command in the required ratio (from 1/1,000 or 0.001mm from millimetres to meters). By copying to the clipboard through a reference point, the reduced design is copied into the drawing where it will then be fitted into the desired position, respecting the requirements such as the street line, linking to the desired objects, respecting the protection zones, and so on. This object can then be demarcated geodetically using the coordinates which we can already precisely read from the situation drawing.
The solution of this type of task will be demonstrated in the example of the layout of a pumping station (PS) into the terrain. The station should pump the water from the drainage channel “C” into the Radošinka stream. The task is to find a suitable place for the PS and to identify the points for the demarcation of the construction. The corners of the construction are, at the same time, the corners of the foundations to be geodetically defined in the terrain. The background documents are:
- the drawing of the pumping station floor plan with the marking of the suction and discharge pipes in millimetres (Fig. 3),
- the situation drawing prepared in meters and in S-JTSK - drawn earth bodies, the watercourse channel, the drainage channel and the route of the track (Fig. 4),
- the drawing of the overhead electrical line - 110 kV voltage - prepared in metres and in S-JTSK (Fig. 4)
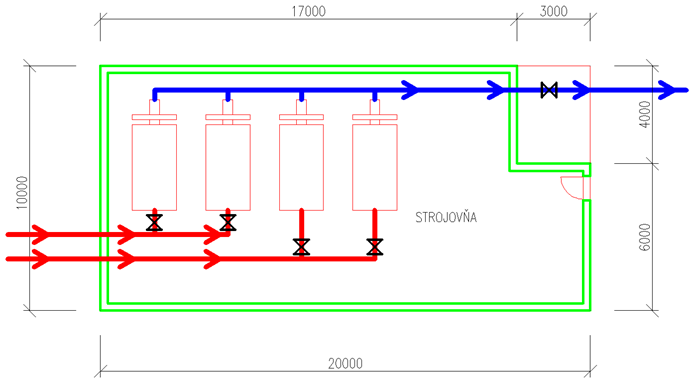
Fig. 3: Floor plan of the pumping station
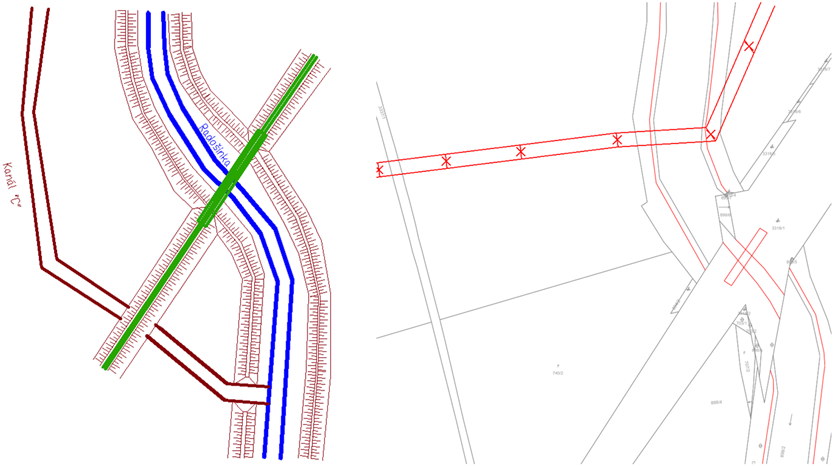
Fig. 4: Situation drawing (on the left); drawing of the electric line route (on the right)
The moving of objects between the drawings in the same coordinate system - UCS (UCS = User Coordinate System) and in the same units when we need to insert the object in the same place - i.e. in case of a model example, the copying of the route of the electric line into its identical position in the situation drawing - both drawings are prepared in meters and in S-JTSK, we use copying using the method of copying into the clipboard through a reference point, where the identical points in both drawings are the beginnings of the coordinate systems - the point with the coordinate [0,0,0]. In the drawing of the route of the electric line, we use the command “COPYBASE” (or use the shortcut Ctrl + Shift + C), we enter the coordinates of the beginning - 0,0,0 - as the reference point - into the command line and select the copied objects - the route of the electric line and the position of the poles of the electric lines. Then, in the situation drawing, we insert the objects in the clipboard (the route and the poles) to the identical point - we use the command “PASTECLIP” (or shortcut Ctrl + V) and we select the beginning of the UCS with coordinates 0,0,0 as the insertion point - we enter them into the command line.
In case of moving the drawing of the pumping station floor plan, which is created in millimetres, into the situation drawing prepared in S-JTSK in meters, we must first ensure the change of the units for the PS floor plan from millimetres to meters. The conversion is done by reducing the copy of the object to one-thousandth of the original dimension: the PS object with the dimensions 20,000 (mm) x 10,000 (mm) PS object will have the dimensions of 20 (m) x 20 (m). In case of texts, their height is reduced to a multiple of the scale value - to one thousandth of the original height of the text; in case of the dimensions, the dimensions are reduced, and therefore the dimension text, but the size of the dimension text, as well as the dimension arrows have the dimensions according to the original dimension style. Therefore, it is necessary to change the style of the created dimensions, or to remove the existing dimensions and to create new dimensions in the style applicable to the objects created in metres. We copy the reduced object to the clipboard through a reference point using the command “COPYBASE” (or shortcut Ctrl + Shift + C), which is selected by clicking on the screen - for example, one of the corners of the object. In the situation drawing, we insert the copied objects - we use the command “PASTECLIP” (or shortcut Ctrl + V) and we enter the insertion point - it can be entered by using coordinates, but since the position of the object layout is not known, it is sufficient to insert the object into any position in the drawing - the insertion point is selected by clicking (Fig. 5).
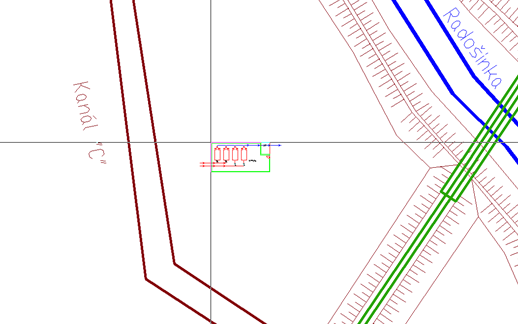
Fig. 5: Insertion of the drawing of the pumping station into the situation drawing
There is no need to reduce the objects when inserting the design of the route of the electric line, as the situation drawing and the drawing of the route of the electric line are prepared in meters. Since both drawings are prepared in S-JTSK, their position in the drawings corresponds to the actual geographic position and therefore the spatial relations between the objects in the two drawings are identical. In this case, we use the copying of the objects from the drawing of the electric line into the clipboard and insert them into the situation drawing. During copying and insertion, as a point of reference, we select a point that is identical in both cases, and that is the point with the coordinate [0,0,0].
Then we fit the floor plan object into a suitable place using basic geometric operations such as moving and rotating. In case of fitting of the situation, we take into account the railway protection zones (60 m from the axis of the outer track - according to the Act No. 513/2009 Coll.) and the routes of the overhead electrical lines - 110 kV (defined by vertical planes on both sides of the line at a horizontal distance of 15 m measured perpendicularly from the outer conductor at a voltage from 35 kV to 110 kV including - according to the Act No. 656/2004 Coll. on the energy sector) - we write these conditions into the drawing using the command “OFFSET”, by which we create lines in the relevant distances according to the object in question, i.e. 15 m from the outer electric conductor and 60 m from the outer track (Fig. 6). If the solution of the fitting requires the respecting of other rules (such as street lines, the rights of property - land borders, other protection zones, economic considerations - e.g. the shortest distances, operating parameters - connection to the withdrawal objects or other circumstances), we also take these rules into account.
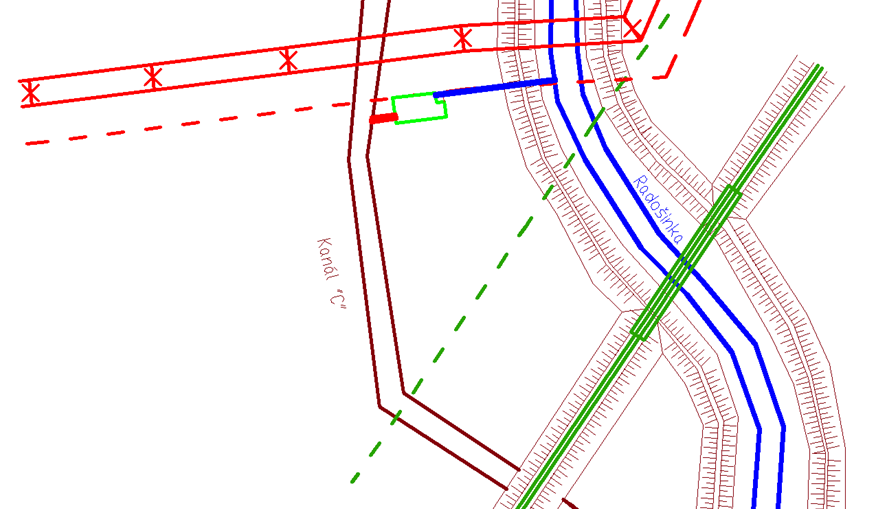
Fig. 6: Final position of the pumping station, respecting the protection zones of the railway as well as the electric line
Creating a new coordinate system
Any manipulation of the drawing content (such as rotating or moving objects for better fitting into the drawing format when printing) made in the S-JTSK coordinate system results in a change in the position of the displayed objects, making it impossible for the construction to be demarcated.
The need to display the rotated drawing content can be solved by creating a new coordinate system that will then be used when displaying in the required in the desired cut-out (Viewport) using the setting of the drawing sheet (Layout), or the description of the drawing (corner stamp, key, notes, etc.) will be created in the rotated UCS which is set to current when printing and is displayed in the Cartesian system (see the drawing viewport in the chapter “Advanced print options”).
To work with the coordinate systems, the “Coordinates” (Fig. 7) panel of the coordinate systems is used on the “View” tab in the 3D modelling work environment or the “Home” tab in the 3D Basics work environment. This panel is not normally displayed in the Drafting & Annotation environment. To display it, you must right-click the “View” tab and select the “Show Panels” option and then select the “Coordinates” panel.
The whole process of making a new UCS should be started with the program setting (Fig. 7 - 2) so that when you change the coordinate system, a view perpendicular to the plane of the floor plan (XY plane) is set, so the creation of the new UCS will result in its automatic setting to the current one and the drawing will be immediately displayed so that the axis x will be horizontal and the axis y will be vertical. This setting can be done in the coordinate systems manager using the command “UCSMAN” or “DDUCS”, or by using the icons on the “Coordinates” panel.
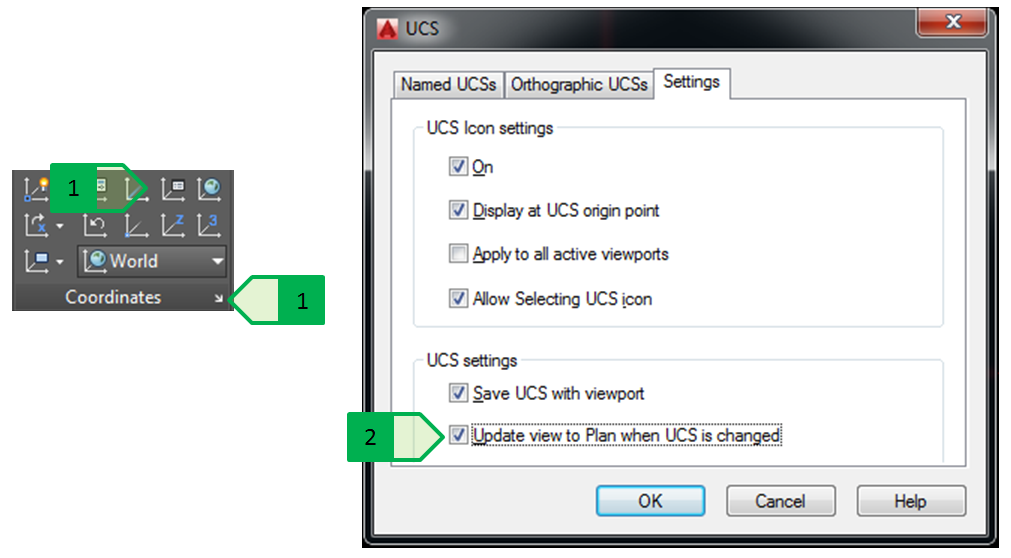
Fig. 7: UCS setting. 1 - opening if the dialogue box on the “Coordinates” panel; 2 - setting the view perpendicular to the plane of the floor plan
A new UCS can be created in several ways:
- Setting according to the area of the 3D object
- Setting according to the object
- Setting according to the current view
- Rotating the current UCS round the selected axis
- Defining the new beginning
- Defining by using three points
For the purpose of the UCS rotation, it is best to use the definition of a new UCS using three points where the first point is the new beginning of the coordinate system, the second point is the designation of the positive part of the new axis x, and the third point is designation of the positive part of the new axis y. The axis z will be determined automatically according to the orientation of the Cartesian system (axis x - positive in the right direction, axis y - positive in the upward direction, axis z in the direction above the XY plane). When using this method, it is then appropriate to select a new orientation of the axes to suit the requirements of the drawing display in the desired rotated display. Before creating a new UCS, it is a good idea to first create the north star that, after the definition of the new UCS and the rotation of the display, allows better orientation in the final drawing.
A practical example will be demonstrated in a simple task - printing of a schematic situation of the Radošinka stream at the bridge of the road to the village of Čakajovce, this situation should be printed in a scale of 1: 5,000 on A3 format, but without the rotation of the drawing it is not possible to place it in the selected format - the size of the design is larger that than the height of the paper size (Fig. 8).
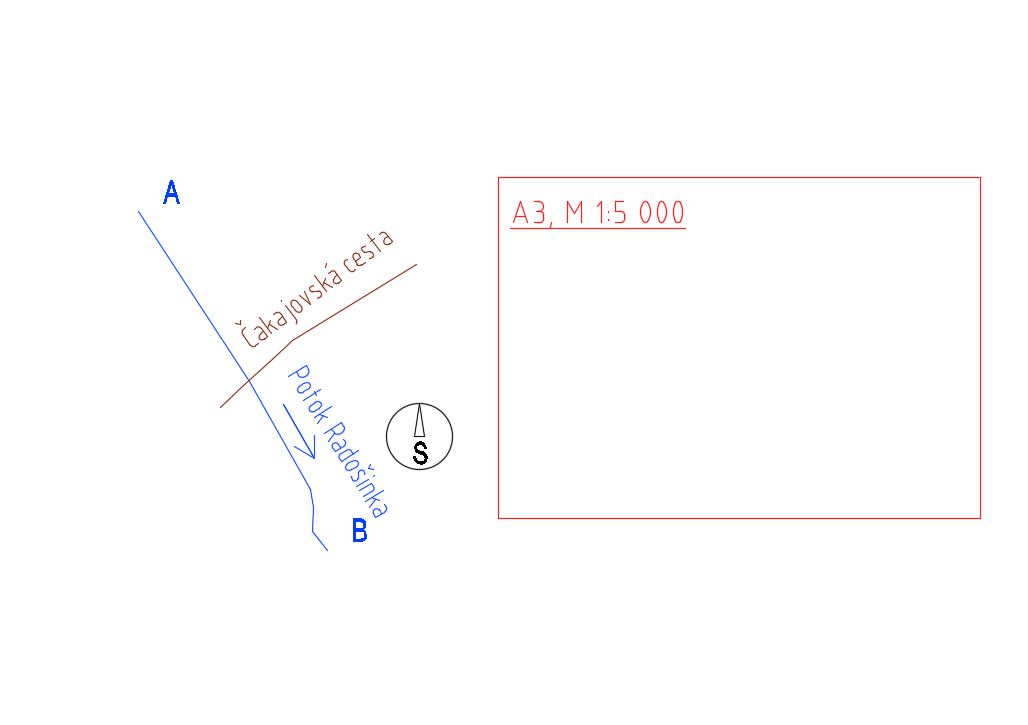
Fig. 8: Situation of the Radošinka stream
Prior to creating a new system, we select the setting of the view perpendicular to the plane of the floor plan, and the creation of a new coordinate system is then started using the following procedure:
1. the command “UCS”
2. in the command line, we select the option “n” - the creation of a new coordinate system
3. in the command line, we select the option “3” - the creation of a new coordinate system using three points: point no. 1 is the beginning of the new coordinate system; point no. 2 is on the positive part of the new axis “X”; point no 3 is on the positive part of the new axis “Y” (Fig. 9).
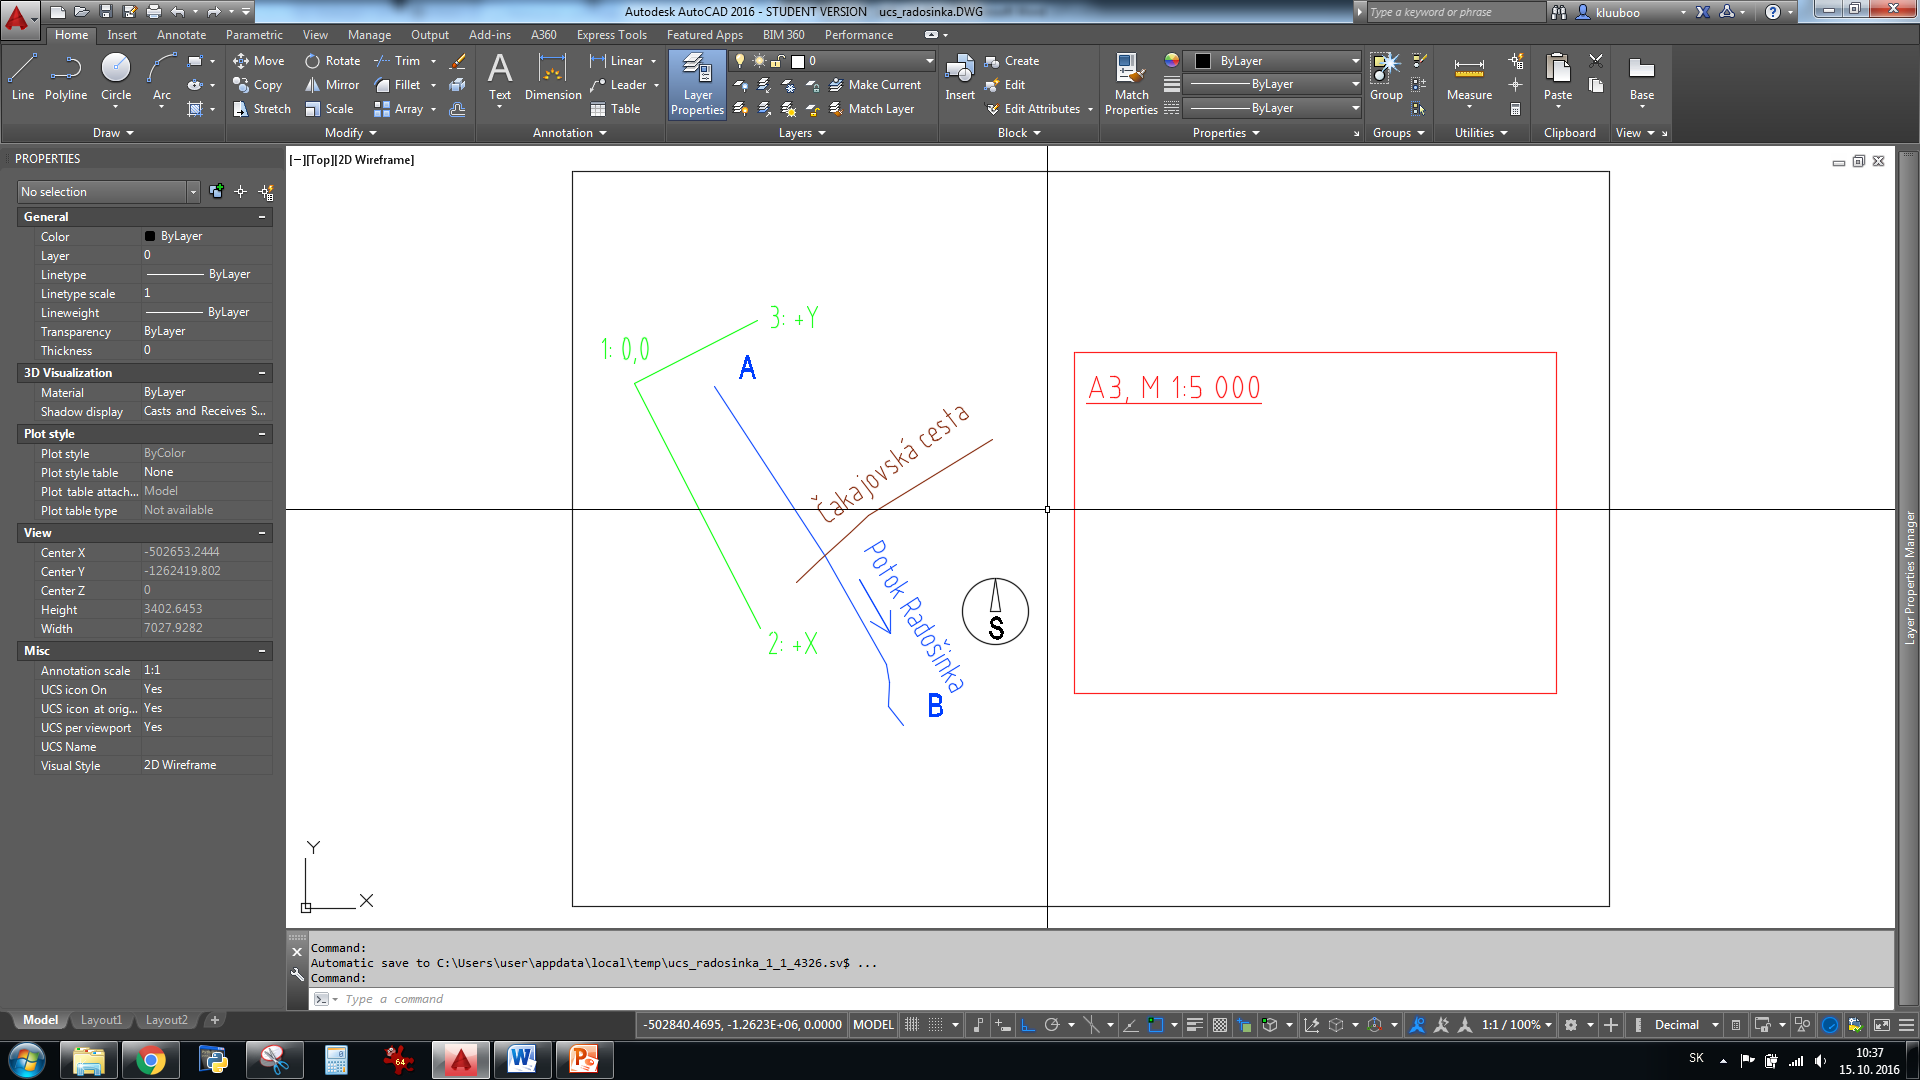
Fig. 9: Creation of a new coordinate system using three points, 1 - beginning of the new coordinate system; 2 - a point on the positive part of the new axis “X”; 3 - a point on the positive part of the new axis “Y”
The new coordinate system created in this way displays the existing drawing in a rotated status as we have chosen the setting of a view perpendicular to the plane of the floor plan (Fig. 10).
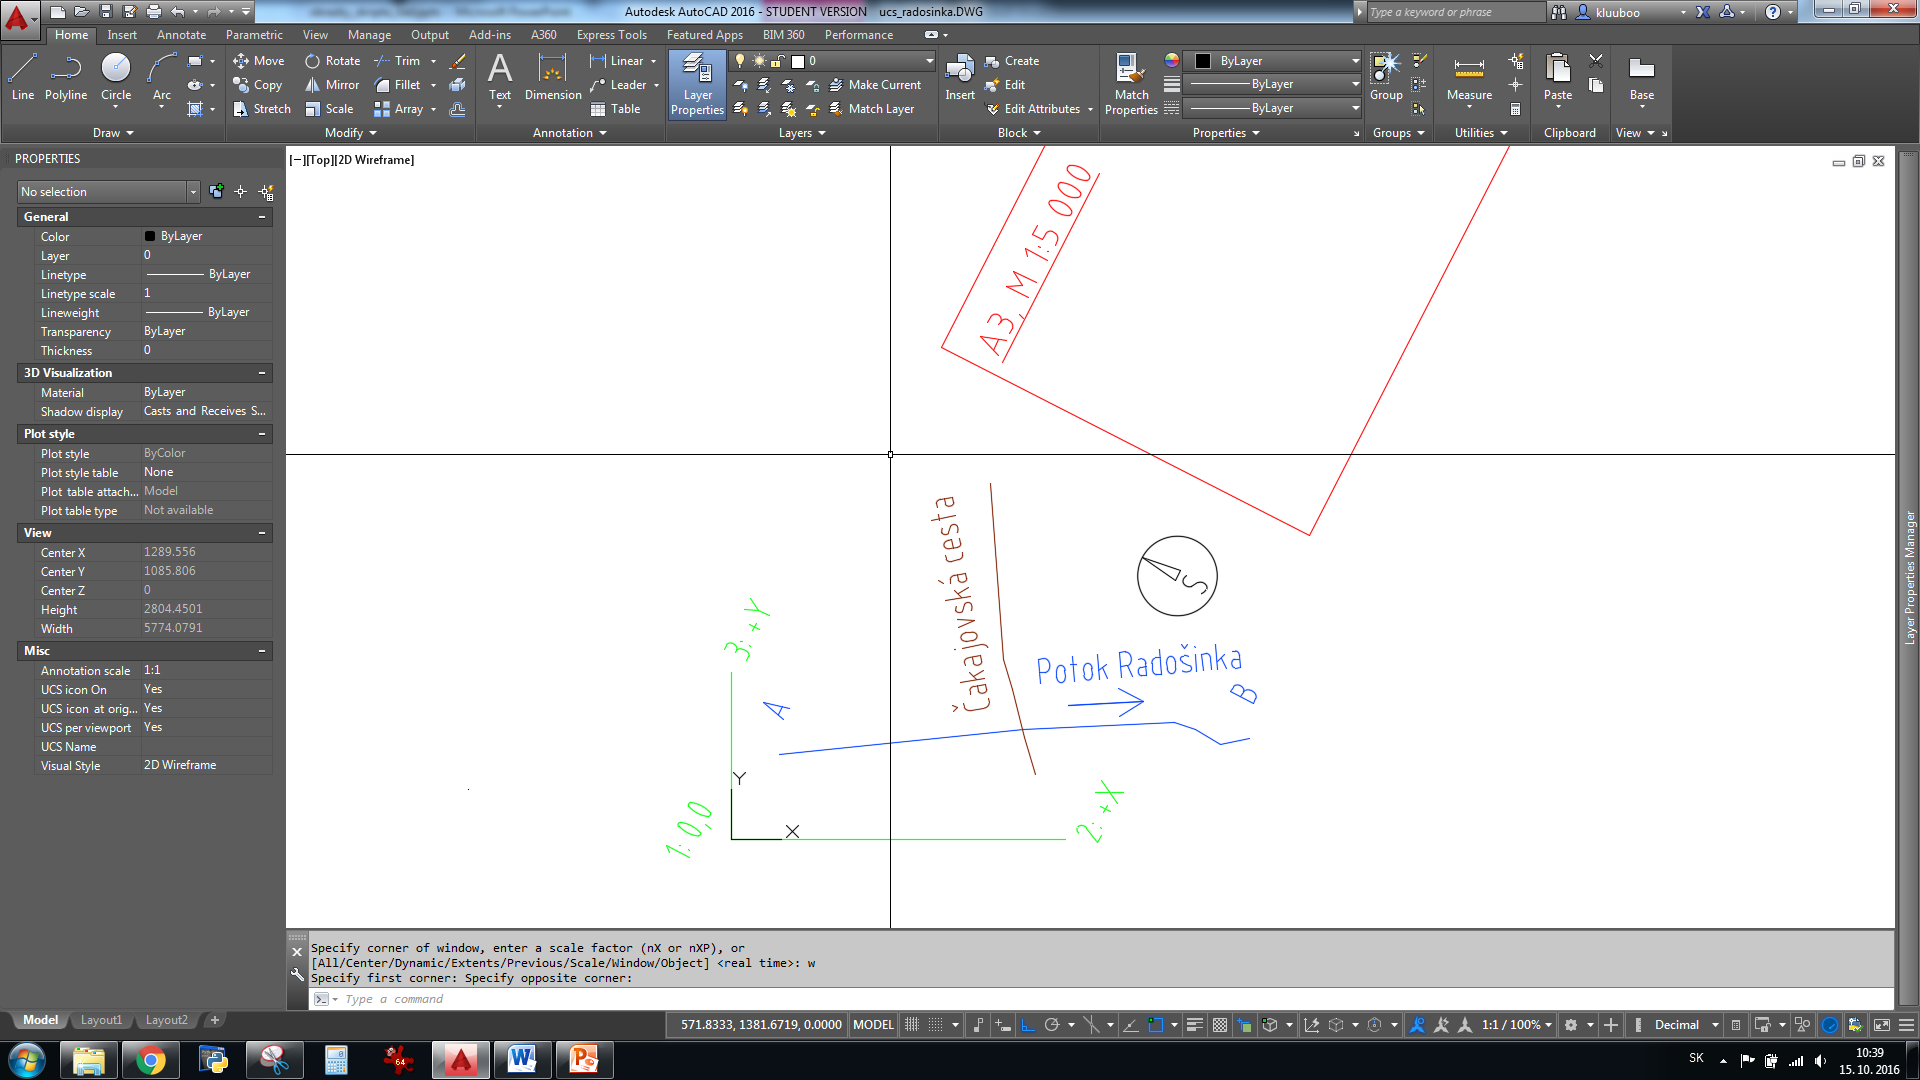
Fig. 10: Drawing with the new coordinate system with the setting of a view perpendicular to the plane of the floor plan
If we did not initially select the setting of a view perpendicular to the plane of the floor plan, the display of the whole drawing would remain oriented in terms of the Cartesian coordinate system without any change, and the coordinates, or the cross line of the cursor would take into account the new coordinate system (Fig. 11).
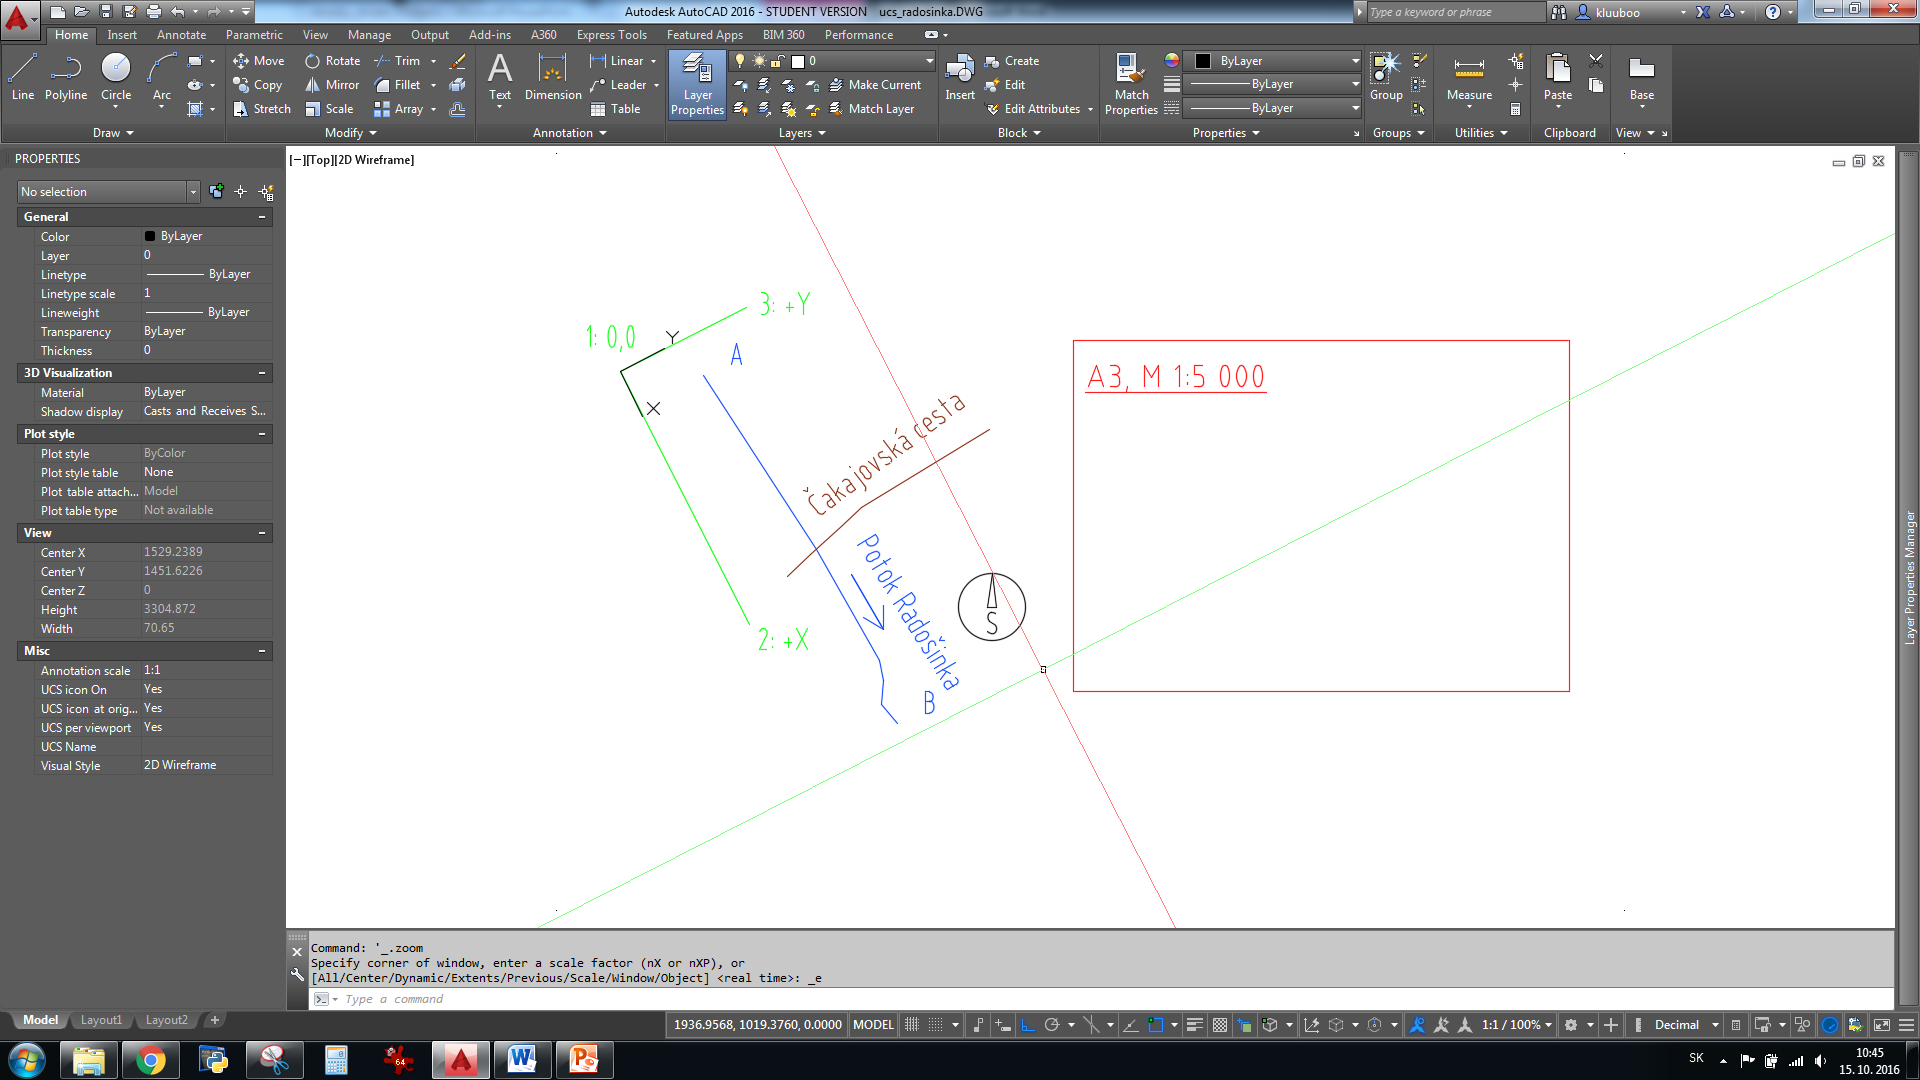
Fig. 11: Drawing with the new coordinate system without the setting of a view perpendicular to the plane of the floor plan
The coordinate system created in this way should be then named in the coordinate system manager (Fig. 12), since the newly created and named co-ordinate system remains stored in the particular drawing.

Fig. 12: Naming and selecting the current coordinate system in the message window of the coordinate systems
The use of the newly created coordinate system means that the existing objects as well as the newly created objects will have the coordinates and angles measured relative to the current coordinate system (Fig. 13).
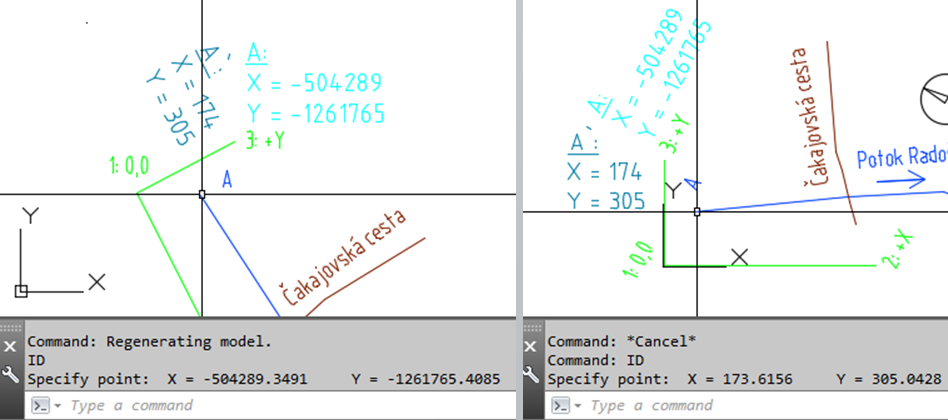
Fig. 13: Coordinates of a point in different coordinate systems, 1 - coordinates of point A in the S-JTSK coordinate system, or “World”; 2 - coordinates of point A in a rotated, newly created coordinate system
but there is a difference in the parameters displayed in the property table (in English: Properties) where the coordinates of the objects will be given with respect to the current coordinate system, but the angles will be given relative to the “World” coordinate system. In the given example (Fig. 14), the command “MEASURE” and the option “A” (angle) were used to measure the angle between the red lines - the value of the angle is 52°, but the line drawn at that angle shows an angle of 349° in the property table - this angle is formed by this line in the “World” coordinate system, it is therefore showed in the properties table.
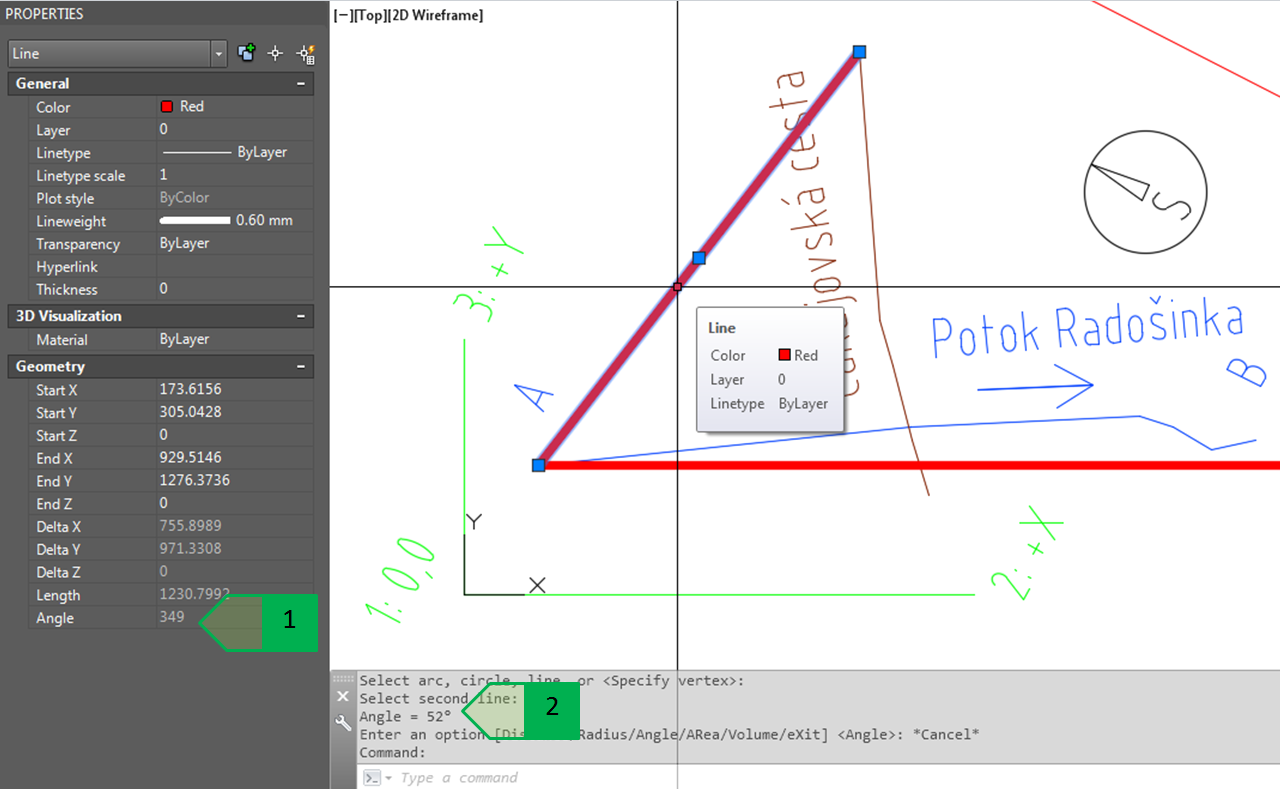
Fig. 14: Determining the value of the angle, 1 - the value of the angle showed in the properties table (in English: Properties); 2 - the value of the angle measured by an angle measuring tool
In this way, it is possible to place the design in a suitable way in the drawing so that the format of the drawing with descriptions, corner stamp, key and other drawing requirements is inserted horizontally, or vertically in a newly created, rotated coordinate system. If the S-subtraction or determination of the coordinates in S-JTK is required, the drawing is displayed in the S-JTSK coordinate system and the required coordinate detection is performed in the drawing displayed in this way (Fig. 15).
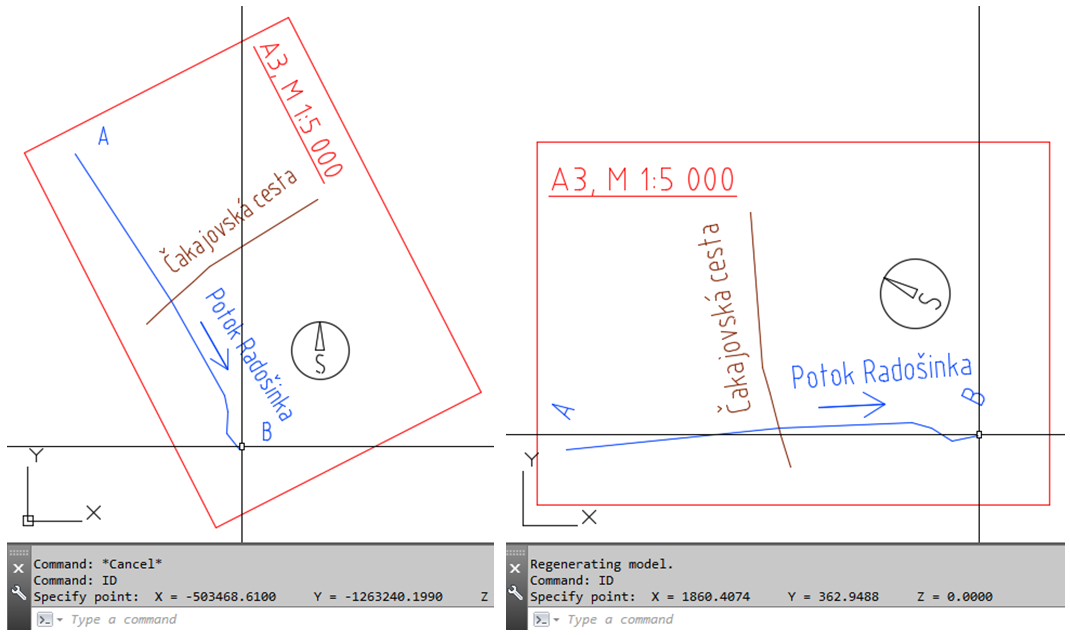
Fig. 15: Use of the newly created coordinate system - displaying the design and the coordinates in the S-JTSK coordinate system (on the left) and the rotated coordinate system (on the right)